Are you ready for some weekend tech fun? Buckle up because we’re about to embark on an exciting journey! Our mission? To create a cutting-edge Raspberry Pi-based image streaming service that brings real-time images right to your phone, no matter where you are. And the best part? It’s all about keeping things locked down tight — your feed, your privacy, and your excitement!
🔧 What You’ll Need for this Awesome Project 🔧
Gather up your tools because we’re about to embark on a tech adventure that’s as exciting as it is educational! Here’s your checklist:
- 🍇Raspberry Pi: The tiny computer with mighty capabilities, perfect for running small computing tasks right from the comfort of your home or lab.
- 📷Raspberry Pi Camera: A budget-friendly 5MP camera that captures surprisingly sharp and clear images.
- ☁️AWS EC2, Azure VM, or a Cloud VM Hosting Service of Your Choice: We’ll harness the power of the cloud to set up our very own Nginx server with mutual certificate authentication.
Setting up Raspberry Pi
Having any OS on Pi should be fine. We shall be using Python in this project. However, I recommend popular Linux distros like Debian or any OS based on Debian.
You can skip this step if you already have a working Pi. Or follow resources like this to flash your SD card and boot and set up Debian on the PI.
Connecting the Pi Camera
With the Pi setup complete and the Pi up and running, let’s get the PI camera on the Pi. Many resources are available on the internet to help us with this. You may follow this one.
Pipeline
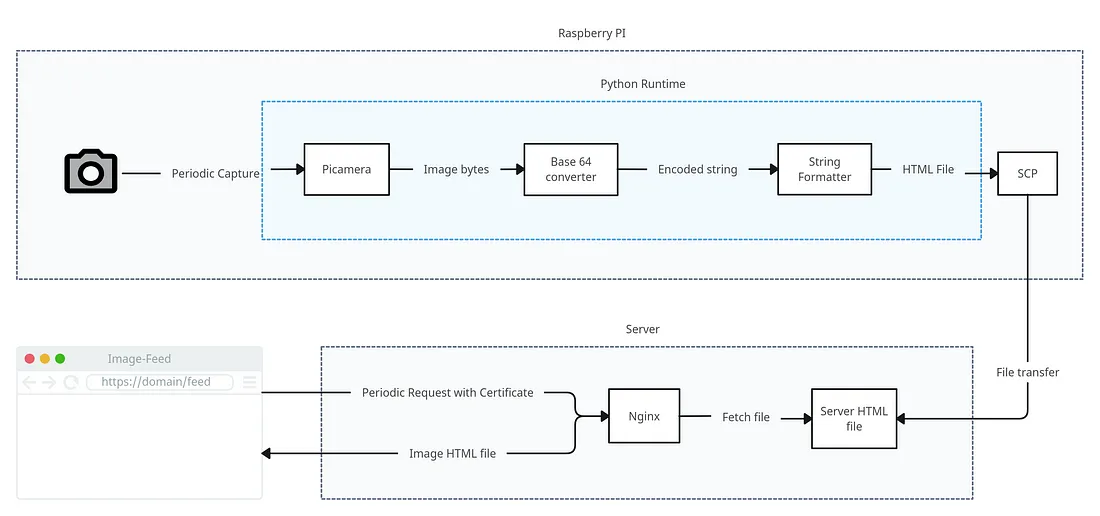
In this project, we shall be creating this pipeline. A brief overview of the steps:
- Python program uses the
picamera2 module to periodically capture images
- Encode and send the picture as an HTML file using SCP
- Create an Nginx config file to serve the file
- Create and install a key certificate to authenticate the client

Pipeline image
read more...

