
Simple Servers
*This is a mirror to the content posted on
Buckle up for a swift journey! This blog is your ticket to setting up the most basic server on your computer. We’ll blend theory with easy-to-follow code explanations, breaking down the magic of socket-based servers. Get ready to unravel the secrets of the simplest sockets in no time! 🌐💡
Prerequisites
A little knowledge of computer systems and some programming would be enough to understand the content. This blog ought to be one of your first blogs on networking and its architecture. An interest in the topic will be sufficient to move forward.
Introduction
In this information age, where most, if not all the devices around us are getting connected, the internet stands as the most revolutionising technology used in our daily life, providing room for a great many opportunities.
The internet is a network of a large number of devices connected and sharing information, together forming the WWW. This technology lays down the path to various computer science areas and sub-disciplines like cloud computing, IoT, Cybersecurity, web development…
It all comes down to the basic knowledge of servers and clients and how the network works. In this blog, I shall be describing the simplest server-client communication based on sockets and how to get that public. So, let’s begin!
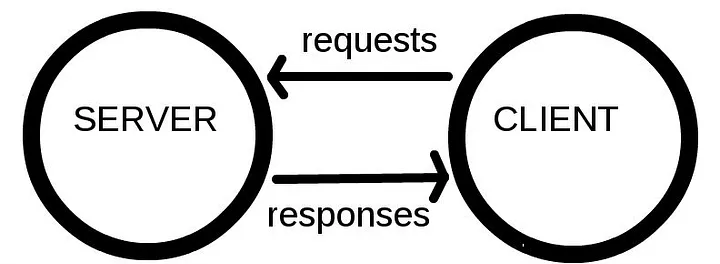
Servers and Clients
For those who don’t know, in the simplest case, a network connection between 2 devices generally involves a machine (server) which provides functionality (help) to the other device (client) in its operation. Typically, they communicate using requests and response.
Before moving ahead, Let me introduce the following terms:
Network Interface
Communication between your computer and the network is through a network interface. Generally present in the form of a network interface card(NIC), virtual interfaces can also be implemented using software. Loopback Interface (mentioned below) is an excellent example of this. Use ifconfig in Linux and ipconfig in Windows for getting the list and details of the interfaces on your device. Generally, wl/wlan represent wlan interface, eth/en represent ethernet and lo represent the loopback virtual interface.
Sockets and ports
OK! So we are ready for a connection, aren’t we?
Socket-port
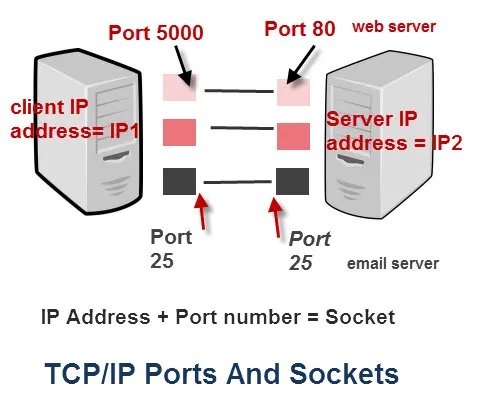
Well, every connection has two ends. And in our case, one is with the client, and one is with the server. At both the end, network writes the received data packets to a file dedicated for that particular connection. Sockets are the file descriptor to the file, which is used to write the data.
Any application may be up at any time to communicate on the connection or establish new ones. Every program should naturally keep an eye on separate file descriptor on the same device. How to handle making separate files for each? and how would new requests from the same device or other be handled, so that they communicate with the exact application they want to? For this, we add a Port number to the network address of the device to identify them separately. Thus, we get a unique address:port combination to reach a particular address. It is like a set of (non-physical) channels where a process can dock to wait for new connections. This combination is called Socket address and is then used to identify separate sockets to identify the file to write data to. Evidently, the targeted application will be listening on the same socket. There are some standard port numbers which various server process take to listen to new requests. Have a look on this wiki.
Localhost

Just Localhost things!
Yo! this is where things get interesting! hmm…
Say your server is ready to be used. You got to check if it is working before deployment! Now Localhost is how you can do so.
As the name suggests, it is used to access network services running on the same device (thus fit for our use). What actually happens is that any request to the localhost isn’t forwarded to the external network interface, but to the Loopback interface. So, we can request any process listening to a socket on the loopback address from the same device itself! The addresses 127/8 (127.0.0.0 - 127.255.255.255) are bound to the loopback interface.
The word ‘localhost’ is mapped to 127.0.0.1 for you already! (Look at the
/etc/hostsfile in Linux). Just set up your server to listen to any port* on the localhost and try pinging it!!
Moving further, there’s another interesting address: 0.0.0.0. It is the joker IP address where we do not want to specify a particular IP address for our connection. If any data directed to the computer (by any IP address) through any interface (including loopback) is received, you can listen to it via the ‘joker’ address, on the particular port. Thus, it can be used as an IP address in the server instead of any particular IP address from any interface. This will enable you to connect to your server from any device in all the network the device is connected.
- Ports 1–1024 are privileged so don’t use them (or get
rootpermission).
Let’s get our hand dirty!
So, after much of the concepts, finally, it’s time to get to some code. I planned to provide the steps with their explanation! But I found resources like this helpful as well. Meanwhile, you can have a look at some code explanation here.
Run the Server code in a terminal. The server will start waiting for a client request. Next, run the client code in a different terminal. If you had done it right, the server and the client must have exchanged their messages.
But broadly, the steps are as follows:
- Make a socket object providing various options and types and protocols.
- bind to an interface or all.
- Start listening to the socket and respond to incoming requests.
- Read and Write to the socket file.
Examples
- vishwasmittal/bare-socket
Simple server and corresponding client written in bare sockets in multiple languages. The server should be written in…
Simple implementation of Socket based server-client programs in multiple languages.
- dev-ritik/files_share
Web development proficiency. Contribute to dev-ritik/files_share development by creating an account on GitHub.
File sharing web and command-line app in C++ based on sockets.
Frameworks
Well, Socket level programming is not done generally in the production servers. These are abstracted and handled by various popular frameworks developers use to build and deploy a production-grade web application to handle real-time traffic from users. While developing simple web applications you may not even know what’s going at the socket level and how connections are handled. Having a framework comes with lots of benefits apart from abstraction. They may be fast, scalable, secure and tested, well documented, have good community support, etc. Some of the leading frameworks of 2020 can be found here.
Going Public
It’s quite cool and sometimes important to be able to access the server on your device from some other device. As such, it’s easy to do so. If you are not on a public-facing device (connected directly to the internet with public IP), you need to use some tricks to be available to anyone on the internet.
For the former case, directly use 0.0.0.0 or your public IP address as the IP address to host your server. For the latter case, we can achieve the same within the private network. Host the server on 0.0.0.0 or the assigned private IP address of the device on the network*. Now on the new device (on the same private network), use that same private IP:port to access the service.
To make your server public from a private network, have a look on how to do it through Port Forwarding. You may be required to take the help of your ISP here. If that looks complex, you can use services like ngrok or Serveo. They help to directly and simply do the task for you.
*Use ifconfig in Linux and ipconfig in Windows for getting the private IP address.
CLI Utilities
There are a bunch of useful utilities to test and interact with servers on the network. These include Ping, Curl, Wget, etc.
- Curl:
$ curl localhost:8000
<HTML>
<Head>
<Title>Title: Bare Socket</Title>
</Head>
<Body>
 <center>
 <h1>
 Hello from server!
 </h1>
 </center>
</Body>
</HTML>
- Wget: Save the received HTML text into a file.
$ wget localhost:8000
 — 2019–12–23 17:44:16 — http://localhost:8000/
Resolving localhost (localhost)… 127.0.0.1
Connecting to localhost (localhost)|127.0.0.1|:8000... connected.
HTTP request sent, awaiting response… 200 OK
Length: unspecified
Saving to: ‘index.html’
index.html [ <=> ] 139 — .-KB/s in 0s
2019–12–23 17:44:16 (5.31 MB/s) — ‘index.html’ saved [139]
Being pretty simple in use, it’s good to try them all once.
🚀 Ready to Conquer the Digital Frontier? This glimpse is just the beginning of your journey into Computer Networking and Services. Dive into my next blog on ‘HTTP & WebSocket’ for an even more thrilling ride. The tech adventure continues! 🌐💻
read more...How are they connected to sockets? How is HTTP evolving? HTTP/2? HTTP/3? QUIC? Is WebSockets the same as Sockets?…