
Trust-TLS-SSL & HTTPS
*This is a mirror to the content posted onIn our last rendezvous with HTTP, we dove into its evolution for better performance. But here’s the plot twist — HTTP alone is about as secure as a paper umbrella in a storm. Yet, that little lock🔐 in the corner of your browser assures you of safety in the vast and sometimes treacherous realm of the internet. Trust me; my server’s access logs tell tales of the wild digital west!
So, what’s the secret sauce behind securing HTTP traffic? What’s the story behind that reassuring lock? How do we establish trust in this cyber jungle? And most importantly, is this Medium article genuinely what it claims to be?
Join me on this journey as we unravel the mysteries of HTTP security. I’ll be your guide, using real-world examples to break down complex concepts without drowning you in technical jargon. Let’s embark on a tech adventure where security meets simplicity! 🚀🔐🌐
Prerequisites
A bit of knowledge of network systems, particularly the TCP, and cryptography will be enough to understand the content. Though, an interest in the topic should suffice anyway!.
HTTPS??
Hypertext Transfer Protocol Secure (HTTPS) is the secure version HTTP. HTTP, as the name suggests, sends data packets as hypertext. Anyone on the internet can easily read these, or hackers can impersonate your server upon using compromised routers like cafes and other public routers or easily tracked and modified by your ISPs. As such, critical information like banking details should not be handled without HTTPS. Even if you don’t host any sensitive data on your server, it’s pretty recommended shifting to HTTPS. (You don’t want an intermediary to modify your content like pushing their advertisements with it without your permission and your website down rated and marked insecure by popular browsers.)
HTTPS helps keep these malicious elements out by using what is called TLS/SSL Handshake, which happens before the actual data is transferred. The crux of this handshake is that your server and your client generate a shared session key using asymmetric cryptography, unique to the world, and then encrypt all the traffic to random data packets. Yes these packets can still be seen and modified by those sitting in the middle, or even the request can be forwarded to a malicious server, but your client software would know that something is wrong and alert the user to switch to a more secure network. How would they know you say? Well, that’s what this blog is all about.
How is HTTP related to HTTPS?
The actual messages are formatted and structured as determined by HTTP. It’s just that they are encrypted to garbage while transmitting and again decrypted by the intended recipient and none else. All HTTP data MUST be sent as TLS application data. By default, HTTP uses port 80 and HTTPS uses port 443. Using HTTPS, only the source & destination IP address, port and domain (SNI) are public. The URL, query parameters, headers, body, and cookies (which often contain identity information about the user) are all encrypted. The amount of data and the duration of communication can also be determined.
Making HTTPS calls using OpenSSL
OpenSSL is a command-line cryptography tool relating to SSL/TLS protocols and related cryptographic functions. As such, it can be easily used for making HTTPS calls. On your terminal,
openssl s_client -crlf -connect example.com:443
GET / HTTP/1.1
Host: example.com
Simple Example
Run the following code to fetch example.com using python. Comments have been added for your help.
Example of a simple HTTPS request
Capturing HTTPS and HTTP Packets
There are a handful of tools, particularly Wireshark, which helps us analyse network packets actually exchanged. Let’s use a similar tool tcpdump to sniff and analyse these packets going to example.com (93.184.216.34). It can sniff all the packets on the target interface and help in analysing the traffic.
HTTP: Let’s use cURL to make an HTTP request. Run this command on the terminal to capture packets:
tcpdump -A -n -s 0 host 3.220.159.10 and port http
Now, make an HTTP cURL request from another
curl --location 'http://postman-echo.com/post' --data-raw 'This is a client secret, not to be revealed!'
This would print the TCP packet in ASCII. If you like, you can get in hex as well. (You can interpret that packet using TCP segment structure as well). Anyways, here you can see among other things, src and dest address & port. What you can also see is the first three messages of the TCP handshake (SYN, SYN+ACK, SYN). Following that you can see the entire HTTP request:
E....B@.@.. ..+#...
.D.P..EQ.t.............
.U....[.POST /post HTTP/1.1
Host: postman-echo.com
User-Agent: curl/7.58.0
Accept: */*
Content-Length: 44
Content-Type: application/x-www-form-urlencoded

This is a client secret, not to be revealed!
And after the server ack, the server reply as well:
E.. .a@…{….
..+#.P.D.t….F….n…….
..]T.U..HTTP/1.1 200 OK
Content-Type: application/json; charset=utf-8
Date: Tue, 28 Apr 2020 17:59:17 GMT
ETag: W/”189-BP2UptWJTIcEngOzrSrBUV1O57Y”
Server: nginx
set-cookie: sails.sid=s%3Anxu4rLgsmTVDxMM8s-9m8UvJ-RniOXlj.x4Jd80JEc2ldtbGd9KVKcnOP%2Bkspz0dYKduOgl4%2FXL0; Path=/; HttpOnly
Vary: Accept-Encoding
Content-Length: 393
Connection: keep-alive
{“args”:{},”data”:””,”files”:{},”form”:{“This is a client secret, not to be revealed!”:””},”headers”:{“x-forwarded-proto”:”https”,”host”:”postman-echo.com”,”content-length”:”44",”accept”:”*/*”,”content-type”:”application/x-www-form-urlencoded”,”user-agent”:”curl/7.58.0",”x-forwarded-port”:”80"},”json”:{“This is a client secret, not to be revealed!”:””},”url”:”https://postman-echo.com/post"}
Following an ack by the client, you can see TCP Connection Termination as well.
The dump has other interesting things as well for your interpretation.
Take away here is that a middleman can sniff your complete HTTP request-response easily.
HTTPS: Use Openssl for HTTPS and make the same request. Trace it using:
tcpdump -A -n -s 0 host 3.220.159.10 and port https
You will see a lot of messages exchanged, from both TCP Handshake and TLS Handshake. But you won’t find any more data than the TCP headers. HTTP data is encrypted to arbitrary bits.
SSL
Secure Sockets Layer (SSL), more commonly called Transport Layer Security (TLS), is a standard security protocol, commonly used by HTTPS, for securing the communication. Data is transferred over the public internet wherein it could easily be spoofed or sniffed if sent as plain text. SSL ensures that this transfer is encrypted using symmetric and asymmetric cryptography. Thus the data actually transferred is garbage to anyone else on the internet(planet) other than their intended recipient. (Even though they might never have met each other and are sitting on the other sides of the planet.)
This is done by what is called SSL Handshake and Certificate trust verification. This SSL protocol dictates how both parties should interact to ensure trust and authentication. All this is carried using what is called an SSL Certificate. This certificate packs a lot of data within it together with a public key. Please note that SSL is not limited to HTTPS. Other protocols like SMTP (for sending emails) are secured as well like SMTPS.
SSL Handshakes
To generate that unique session key for encryption, both parties need to agree on particulars of the conversation. So this Handshake is that pre-conversation agreement. During the Handshake, the following things happen:
- Both parties agree on the protocol version.
- Decide on the cypher suites to use
- Prove the identity of the server (and the client if required)
- Decide on the symmetric common session key for both parties

courtesy: https://techcommunity.microsoft.com/
Again, it all starts with a Socket based connection (A TCP handshake). The server is waiting on accept, i.e. waiting to accept a new TCP Socket connection and the client (browser) will connect soon. What happens during a socket connection (TCP Connection) is handled at the transport layer level. During the SSL Handshake, this is generally what happens:
- Client Hello: The client sends a request for a secure connection with the server. It requests that the web server identify itself. It also includes other fields for initiating the agreement like supported versions and cyphers.
- Server Hello: The server replies with its SSL certificate proving it’s identity. Note that the certificate also contains its public key. It also replies with some of its fields like selected version and cypher. It may ask for a client certificate request.
- Authentication & ClientKeyExchange: The client verifies the certificate received, through which it confirms that the server is indeed who it claims to be and the public key does genuinely belong to the server and not forged by someone on the public internet. (Again it’s all Cryptography!) The client, upon trusting the certificate and the public key, generates an asymmetric pre-master secret and sends it encrypted using the server’s public key. (Intelligent only that server can decrypt it using its Private key.)
- Private key: The server decrypts the pre-master secret using its private key.
- Session keys: Both client and server perform a series of steps depending upon the cypher and computes the session key. Hence, by the laws of cryptographic algorithms, they have shared a symmetric key which only these 2 devices on the planet claim to have and no other on the public internet (sorry MITM).
- Finish: The server and the client acknowledge each other by sending a “finished” message that is encrypted with the session key!. The secure connection is thus established, and their communication is encrypted now.
The exact steps may be slightly different based upon the cyphers and the version of the protocol used.
Note that in this form of connection, the client certificate is not required. SSL verification of clients is also possible and required under some conditions wherein the server requires the client to verify as well! Well browsers don’t fit in those conditions.
Certificates
The SSL Certificate establishes the identity of an entity on the Internet. It is like a small document of trust wherein the entity records its public key and organisational details etc. The credibility of these certificates is established on the chain of trust anchored to the trusted authorities on the Internet using cryptographic wizardry!
Let’s get our hands dirty on these certificates!. There’s a lot to grab in them and let’s try to pocket some of them. It’s effortless to get the certificates of a web service. Using openssl is one such method. For medium.com, you can see the certificate using this command:
openssl s_client -showcerts -connect medium.com:443 </dev/null
Most popular browsers let you get these certificates as well.
Starting with a sample certificate!. In your browser, click on that lock symbol on the search bar and download Medium’s certificate, it used to negotiate an SSL connection with your browser. This is how it looks now:
-----BEGIN CERTIFICATE-----
MIIHOjCCBiKgAwIBAgIQCKfj9u8gdru4ZGLwtU+igTANBgkqhkiG9w0BAQsFADB1
<Base64 Encoded text>
4JrHEaQHgEi13M29EUMqB3azOqcov4m1QZH0ygih6UFPol0+InswHa84ZTDmPOpt
gSl68MrGmFqTfywSCfStLmMZJWjfW/3OHFzvGMX2
-----END CERTIFICATE-----
This looks like a lot of base64 encoded gibberish but saves this in a file medium.crt and run the command,
openssl x509 -in medium.crt -text -noout
You can see all the details it has within itself. Among other things, it contains,
Issuer: C = US, O = DigiCert Inc, OU = www.digicert.com, CN = DigiCert SHA2 Extended Validation Server CA
Indicating that DigiCert SHA2 Extended Validation Server CA issued medium this certificate and
Subject: businessCategory = Private Organization, jurisdictionC = US, jurisdictionST = Delaware, serialNumber = 5010624, C = US, ST = California, L = San Francisco, O = A Medium Corporation, CN = medium.com
is the description of the entity(medium) it is issued to.
Now if you download DigiCert SHA2 Extended Validation Server CA‘s certificate and run similar command, this is what you get:
Issuer: C = US, O = DigiCert Inc, OU = www.digicert.com, CN = DigiCert High Assurance EV Root CA
Indicating that this itself was issued by DigiCert High Assurance EV Root CA. You can see a chain like trust-building! Upon downloading this one, you will see that issuer is the same as the one to whom it is issued to,
Issuer: C = US, O = DigiCert Inc, OU = www.digicert.com, CN = DigiCert High Assurance EV Root CA
Validity
Not Before: Nov 10 00:00:00 2006 GMT
Not After : Nov 10 00:00:00 2031 GMT
Subject: C = US, O = DigiCert Inc, OU = www.digicert.com, CN = DigiCert High Assurance EV Root CA
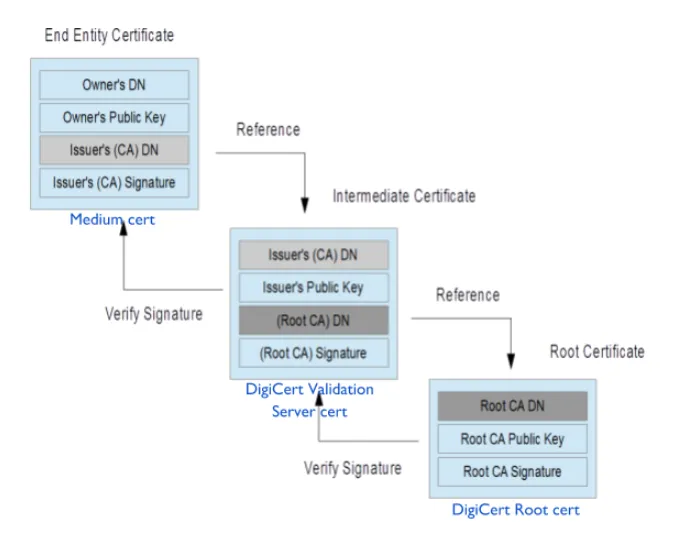
Medium certificate chain
So should we trust DigiCert High Assurance EV Root CA and by extension medium!? Well yes! They are the trust anchors (Certifying Authorities) of the internet trust network, and mostly every SSL software keeps a copy of these certificates or gets it through support libraries. They have to comply with the set of security guidelines established by these Softwares (like Browsers). As can be seen here, certificates are generally signed by other certificates forming the certificate chain. This chain terminates at a self-signed authoritative certificate provided by these root Certifying Authorities (CA)s like Digicert Root CA. There are cryptographic algorithms to ensure that if certificates are indeed signed by the issuer (discussed later).
Also, if you are following along using openssl, you must have noted that medium doesn’t actually send this root certificate. The browser itself, in fact, adds it. The server may not send the root CA certificate if it wants to. (RFC Reference).
You can also verify the certificate chain using openssl. As explained in the picture above, Issuer (Digicert CA) signs the certificate containing the public key of the requester (Medium). It uses it’s own private key to generate a cryptographic signed hash of the data provided with the request and sends that in the certificate. Now cryptography says that only Digicert’s public key can decrypt it, which is available with its own certificate. So let’s get
- Digicert pubkey: To get the included Digicert’s public key from its certificate use
openssl x509 -pubkey -noout -in DigiCert\ SHA2\ Extended\ Validation\ Server\ CA.crt > DigiCert.pub - Medium signature from the certificate: You can extract the Digicert signed hash in the medium’s certificate and convert it into binary:
openssl x509 -in medium.crt -text -noout -certopt ca_default -certopt no_validity -certopt no_serial -certopt no_subject -certopt no_extensions -certopt no_signame | grep -v ‘Signature Algorithm’ | tr -d ‘[:space:]:’ | xxd -r -p > medium_signature.bin - Cert body: To get the body of the cert which was actually hashed,
openssl asn1parse -in medium.crt -strparse 4 -out cert-body.binFinally, run the command (sha256 in this case),
openssl dgst -sha256 -verify DigiCert.pub -signature medium_signature.bin cert-body.bin
>>>> Verified OK
This shows that Digicert CA actually signed the medium’s cert and everything in medium’s cert (including medium’s public key) is actually genuine if Digicert’s certificate is genuine. This certificate chain of trust is the backbone of trust on the internet. More details on this can be found here. This was just signature verification, but other things like validity and revoking trust check also comes into play.
Where to look for the certificates I trust? Softwares like your OS comes with its list of trusted anchors.
- For Linux, the file
/etc/ssl/certs/ca-certificates.crtcontains the concatenated list of trusted CA’s certificates which defines the base trust for your OS and other software which use that file as default. requestslibrary in python has this file wherein it looks for the root CA certs. You can see that it depends on thecertifipackage. This package contains updated root CA certificates for major trust anchors. (Like if you see their PyPI page, ‘Python package for providing Mozilla’s CA Bundle’). Certifi comes with its list of certs when downloaded, available here.- In python
urllib3, it says here that, ‘Unless otherwise specified urllib3 will try to load the default system certificate stores. The most reliable cross-platform method is to use the certifi package which provides Mozilla’s root certificate bundle’. - For chrome, go to
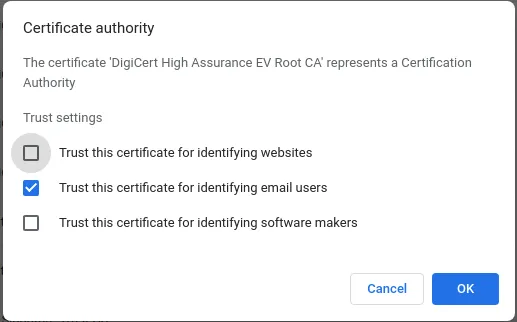
chrome://settings/certificatesonto theAuthoritiestab, and search for DigiCert, you will getDigiCert High Assurance EV Root CAthere. If you compare these two, they are actually the same! Hence Chrome establishes trust for this certificate for you! And hence you see that green lock there on the search bar!. You can get it on the Firefox as well!.
Look how chrome complained when I denied chrome to use that certificate to verify medium! XD
Manually removing trust for Digicert Root CA.

Not Secure Warning on the search bar
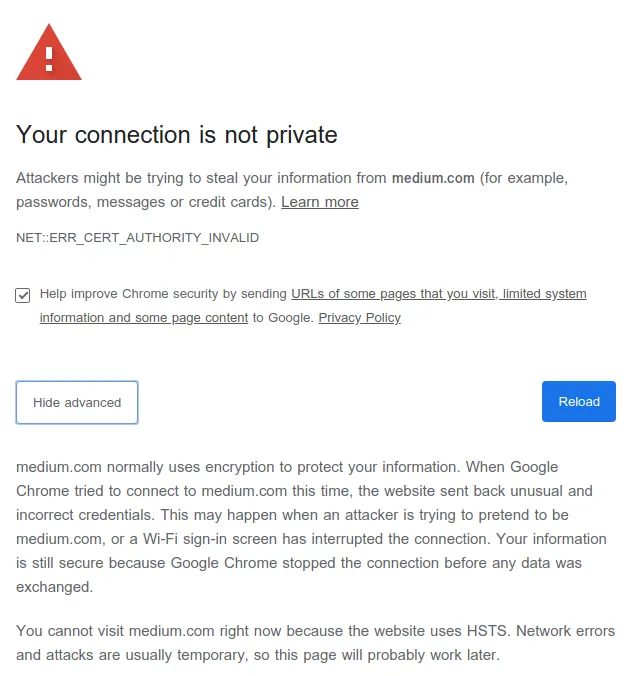
NET::ERR_CERT_AUTHORITY_INVALID
Let me explain what just happened. During SSL handshake, Medium didn’t provide all the 3 certificates! It just provided its own certificate, cryptographically signed by DigiCert SHA2 Extended Validation Server CA bundled with the latter’s certificate signed by DigiCert High Assurance EV Root CA. But since Chrome now doesn’t trust this Root CA, it cannot guarantee the user if it is indeed medium. It may be any malicious website pretending to be medium and proceeding further is probably unsafe.
Let me describe another case. Consider that the server doesn’t send its certificate chain and rather send the leaf certificate (signed by an intermediate authority and not directly by your trusted root CA). What happens then!. Well, it all depends upon the implementation of the certificate verification program. Certificates contain fields (along with Issuer DN (Distinguished Name) mentioned above) which help the program to fetch that intermediate certificate from other sources. This may be utilised to fetch and build the chain and hence build trust. Chrome does this automatically for you, but firefox probably gives a warning. But for libraries like python request, this isn’t the case. You will certainly get verification errors in this case! Here, a temporary solution will be to add intermediate certificates yourself as trusted (for the time being).
Simple Example
To get the simplest SSL based communication, you would need a certificate for the server, which can be verified by our demo client. This is explained beautifully here.
For experimenting with different types of certificates, have a look at this website.
How to get a certificate for my website?
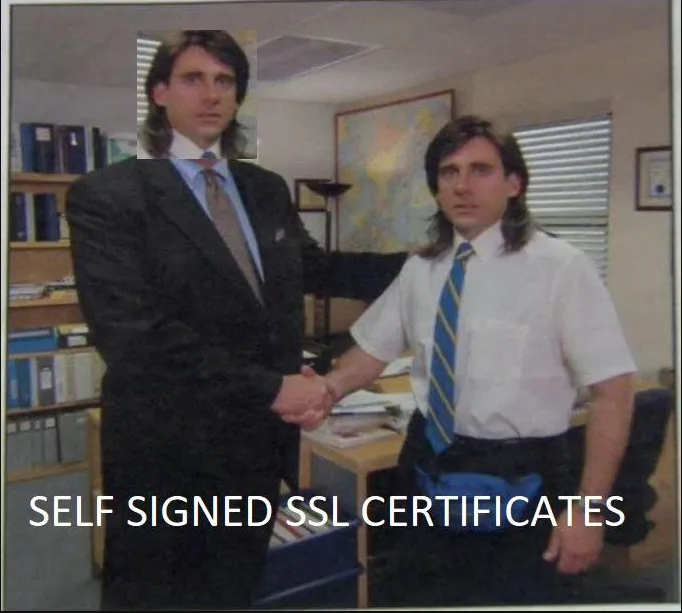
Self-Signed Certificates!
As you must have guessed by now, you can indeed generate your own self-signed certificate and use that to establish yourself as the trust anchor for your closed testing environment. But that won’t work in production. Your users won’t trust your signed certificate. Instead, browsers and search engines will demote your website. Indeed your communication will be secure though! (assuming that it is with your server and not any other impersonated server!)
You would obviously try to get certificates from established trust anchors on the internet. Now there are tons of CA on the internet both paid and free ones. I personally use Let’s Encrypt for my websites (not a paid promotion!). It’s free and easy to use. To get a certificate for your website’s domain from Let’s Encrypt, you have to demonstrate control over the domain. Assuming that you are hosting your service on some virtual servers like AWS yourself, it basically boils down to your server listening to the IP address attached to your domain and you having SSH access into the system. It comes with a handy tool called certbot. It can automate certificate issuance and installation with no downtime. For my website, I have automated the process using these shell commands:
$ wget https://dl.eff.org/certbot-auto; chmod a+x certbot-auto
$ sudo ./certbot-auto certonly -- non-interactive -- email <email> -- agree-tos -- standalone -- domains <domain> -- keep-until-expiring -- debug
$ sudo ln -sf /etc/letsencrypt/live/<domain> /etc/letsencrypt/live/cert
This generates a cert and private key for your website and stores the Let’s encrypt intermediate cert as well for the trust chain at /etc/letsencrypt/live/cert/ . Now you could easily add their location to Nginx or Apache(httpd) server config file or use them with the simple HTTPS example mentioned above.
Conclusion
🎉 Phew! That was a content-packed ride! 🚀 Unraveled the mysteries of TLS, didn’t we? Dive into the intriguing world of cryptography and explore more with my examples. Play, learn, and enjoy the tech playground. Ready for hands-on fun? Check out the repository for a real-life implementation based on what we’ve explored! 💡💻
dev-ritik/Secure-file-transfer
read more...A demonstration for secure file transfer within an organization using key-chain validation. The files are secured using asymmetric encryption…